I'll be honest—when I first heard about show grooming, I thought it was completely out of my wheelhouse. I'm a guinea pig person, after all, and my grooming routine involves gentle brushing sessions with my cavies while they contentedly munch hay. But when a fellow pet parent asked me to help research how to groom dog for show, I dove into this fascinating world and discovered it's surprisingly similar to the meticulous care I give my small pets—just on a much larger, often wetter scale.
Whether you're preparing your Golden Retriever puppy for their first show or getting your veteran Standard Poodle ring-ready, understanding how to groom dog for show properly makes the difference between a polished presentation and a disappointing outing. This comprehensive guide walks you through every step of the show grooming process, from pre-bath prep to final ring-side touches.
Skill level: Intermediate to advanced (beginners should expect a learning curve of 3-6 months to develop proficiency)
Time estimate: 3-8 hours depending on breed, coat type, and your experience level
What You'll Need
Before you start grooming, gather these essential supplies. Trust me—having everything within reach prevents those frantic mid-bath searches I know all too well from my own grooming sessions.
Bathing supplies:
- Breed-appropriate shampoo (whitening formulas for light-coated breeds, texturizing for wire coats)
- Conditioning treatment suited to coat type
- High-velocity dryer or forced-air dryer
- Absorbent towels (microfiber works brilliantly)
- Non-slip mat for tub or grooming table
- Spray nozzle attachment for thorough rinsing
Grooming tools:
- Chris Christensen Big G Slicker Brush for coat preparation
- Metal comb (wide and fine-tooth options)
- Thinning shears for blending
- Straight shears (7-inch and 9-inch)
- Curved shears for sculpting
- Nail clippers or grinder
- Ear cleaning solution
- Styptic powder (for any nail quick accidents)
Finishing supplies:
- Coat conditioner or finishing spray
- Grooming chalk or powder (for white markings)
- Grooming spray for final polish
- Show lead appropriate for your breed
- Crate with clean bedding for transport
Prerequisites:
- A dog show grooming table with adjustable arm
- Understanding of your breed standard (consult breed club guidelines)
- Patience—lots of it
Step 1: Study Your Breed Standard and Plan Your Grooming Timeline
The absolute first step in learning how to groom dog for show isn't picking up scissors—it's understanding exactly what the judge expects to see for your specific breed. The American Kennel Club publishes detailed breed standards that describe ideal coat texture, length, and presentation style.
I learned this lesson the hard way with my guinea pigs. For months, I thought any brushing was good brushing until I discovered that Peruvian cavies need completely different grooming techniques than American short-hairs. Same principle applies here—a Cocker Spaniel requires dramatically different preparation than a Siberian Husky.
Start your timeline 7-10 days before the show for most breeds. This gives you time to bathe, allow the coat to settle naturally, and make final adjustments. Wire-coated terriers often need hand-stripping done 6-8 weeks prior, while Poodles require precision clipping 3-5 days ahead. Senior dogs may need gentler, shorter grooming sessions spread over more days—check our guide on senior dog care for age-appropriate considerations.
Download your breed's illustrated standard from the parent breed club. Print it. Study the angles, the coat length at various body points, the precise shape of the furnishings. Notice where the coat should lie flat versus stand off the body. This document becomes your roadmap.
Create a written grooming plan that notes: bath day, drying technique, which areas need trimming versus scissoring, when to trim nails (usually 3-4 days before to allow quick recession), and your final touch-up schedule. Puppies under 12 months often have softer, fluffier coats that require different handling than mature adult coats.
Step 2: Pre-Bath Preparation and Coat Assessment
Never—and I mean never—bathe a matted or tangled coat. You'll turn those tangles into felted concrete that requires shaving to remove. It's the grooming equivalent of trying to clean a guinea pig cage without removing the piggies first—technically possible but guaranteed to create chaos.
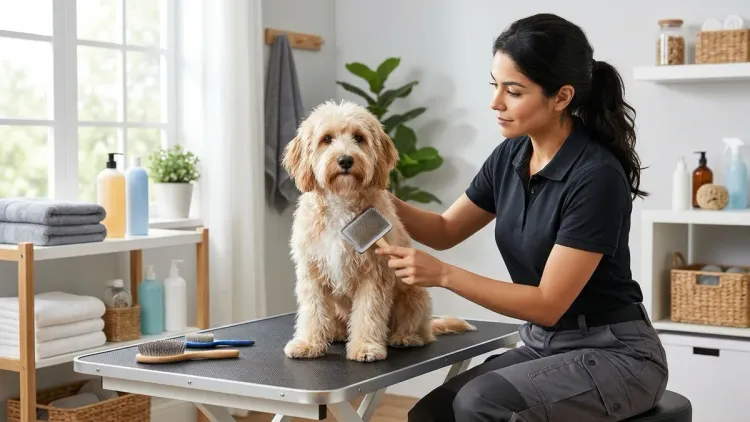
Thoroughly brush your dog's entire coat before bathing. Work systematically from head to tail, using a slicker brush for the topcoat and a metal comb to check for hidden mats near the skin. Pay special attention to friction areas: behind the ears, under the collar line, armpits, and the rear end. These spots mat faster than you'd believe.
For double-coated breeds like German Shepherds or Golden Retrievers, use a undercoat rake to remove loose undercoat. This dead hair will shed during bathing anyway, and removing it beforehand makes drying infinitely easier. Wire-coated terriers need hand-stripping or carding tools to remove dead outer coat.
Trim nails now, not after the bath. Wet nails are softer and more likely to split, and the quick becomes less visible. If your dog has black nails and you're nervous about quicking them (totally understandable), trim conservatively and use a grinder for final smoothing. Have styptic powder ready regardless—accidents happen even to experienced groomers.
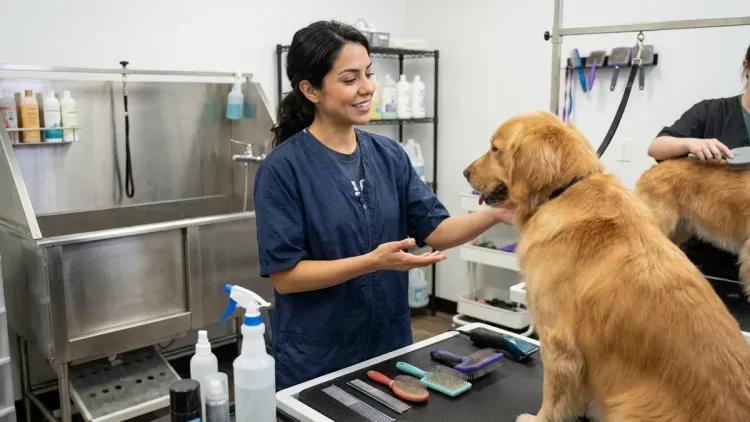
Check and clean ears using veterinary-recommended ear cleaning solution. Gently wipe the visible portions of the ear canal with cotton balls—never insert anything deep into the ear. Breeds with heavy, pendulous ears or hair-filled ear canals need extra attention. If you notice redness, discharge, or unusual odor, consult your vet before the show.
Assess your dog's overall condition honestly. Are they at proper show weight? Is their coat in good health, or are there thin spots that need addressing? You can't groom your way out of poor nutrition or health issues, just as I can't brush my guinea pigs into health if their diet lacks vitamin C.
Step 3: The Show Bath—Technique Matters More Than Products

The bathing process for show dogs differs significantly from a regular maintenance bath. You're not just cleaning; you're optimizing coat texture, enhancing color, and creating the foundation for everything that follows.
Start with lukewarm water—never hot, which can soften coat texture, and never cold, which doesn't clean effectively. Thoroughly saturate the coat down to the skin. This takes longer than you'd expect, especially on water-resistant double coats or wire coats. I spend a good 3-5 minutes just on the saturation phase for medium-to-large dogs.
Apply breed-appropriate shampoo diluted according to bottle directions (usually 10:1 or 20:1 ratio). Concentrated show shampoos work better when diluted—they distribute more evenly and rinse cleaner. Work the shampoo through the coat with your fingers, not by scrubbing vigorously, which creates tangles. Think gentle massage, not aggressive lathering.
For white or light-colored dogs, use a whitening or brightening shampoo on the first wash. For wire coats, choose texturizing formulas that enhance the harsh outer coat. Smooth-coated breeds benefit from protein-enriching shampoos that add shine without softening.
Rinse longer than feels necessary—then rinse again. Shampoo residue dulls coat, attracts dirt, and can irritate skin. I rinse for at least five minutes, working my fingers through the coat while the water runs clear. When you think you're done rinsing, you're probably 60% done.
Apply conditioner only where breed standards require softness—usually the furnishings, ear feathering, or tail plumes. Many breeds should never receive conditioner on the body coat, as it creates the wrong texture. Let conditioner sit for 2-3 minutes, then rinse completely.
For most breeds, a second shampoo application creates the cleanest, brightest finish. Use less product the second time and rinse even more thoroughly.
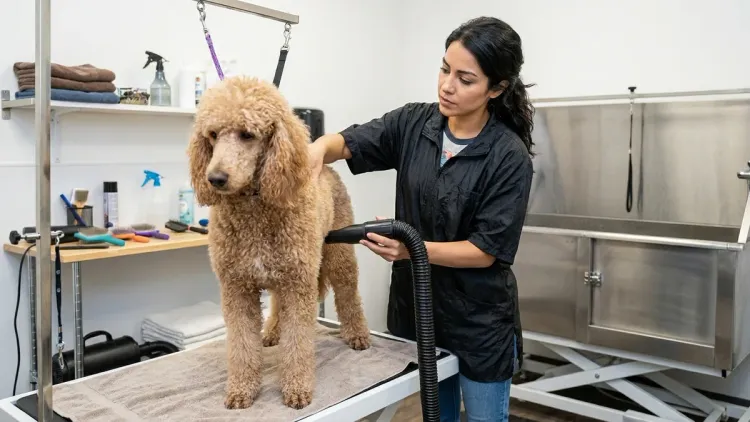
Step 4: Strategic Drying for Correct Coat Texture and Volume
How you dry dramatically impacts the final presentation. The goal isn't just dryness—it's achieving the coat texture and direction that matches your breed standard while preventing the coat from becoming flyaway or frizzy.
Start by gently squeezing (never wringing) excess water from the coat. Wrap your dog in absorbent towels and press firmly to remove more moisture. Some groomers use a chamois cloth for smooth coats, which wicks water incredibly effectively.
For most show dogs, use a high-velocity or forced-air dryer rather than a cage dryer. These powerful dryers blast water out of the coat while straightening and directing hair growth. Set the dryer to medium heat—high heat can damage coat and burn skin, while cool air takes forever and doesn't set the coat properly.
Work systematically, drying the body before moving to legs and furnishings. Direct the airflow in the direction you want the hair to lie, brushing simultaneously with a slicker brush or pin brush. This technique straightens the coat while adding volume for breeds that need it.
For double-coated breeds, dry the undercoat first by blowing air against the grain, then finish by directing hair in its natural growth pattern. For Poodles and similar breeds that need volume, dry the coat upward and outward while brushing vigorously. For smooth-coated breeds, use a softer setting and brush in the direction of hair growth for a sleek finish.
Ensure the dog is 100% dry before stopping. Damp patches will dry with weird crimps and waves that ruin the smooth finish you've worked for. This is especially critical on feathering and furnishings. Feel deep into the coat with your fingers—if there's any coolness, keep drying.
Puppies may need breaks during the drying process, as it can be overwhelming. Keep sessions positive with treats and praise—you want your young dog to associate show prep with pleasant experiences. For training treat ideas that won't upset their stomach before showing, check out our guide to low-calorie training treats for puppies.
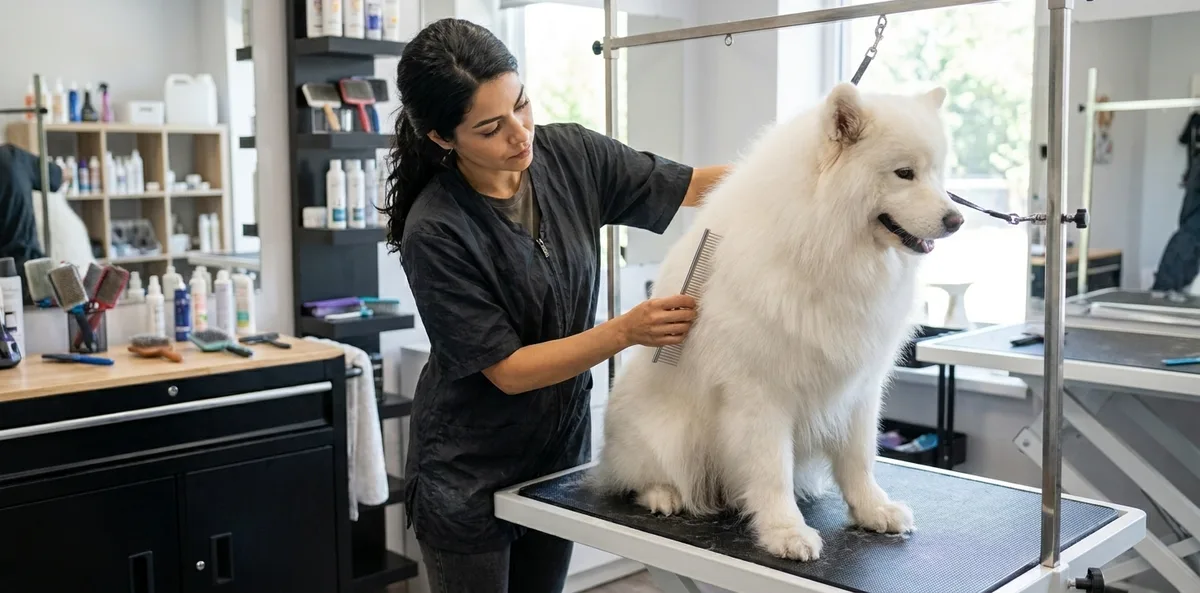
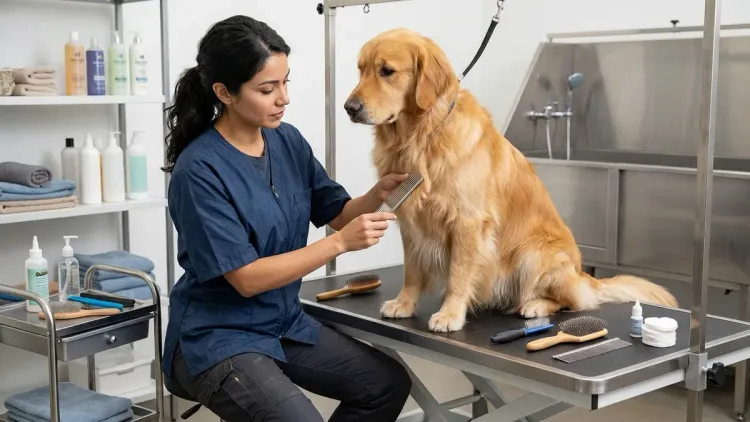
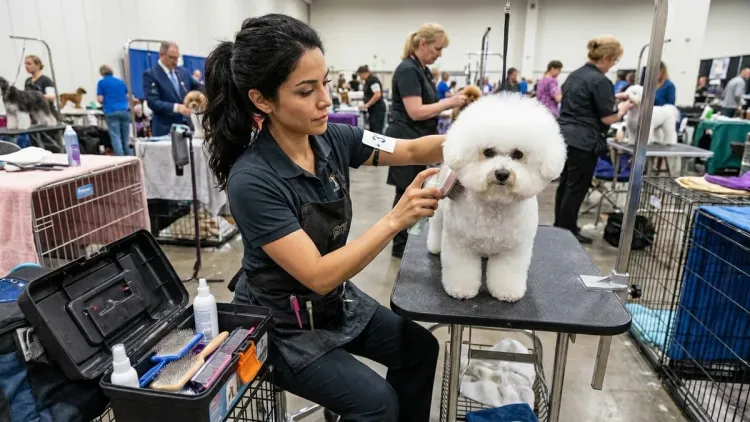
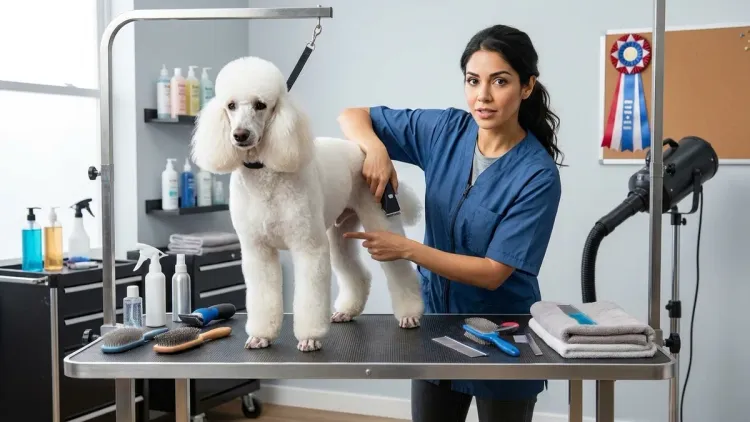
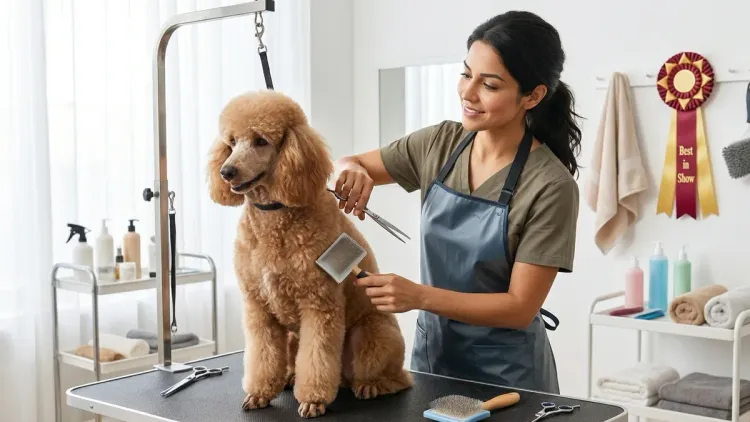
Step 5: Scissoring and Trimming to Enhance Structure
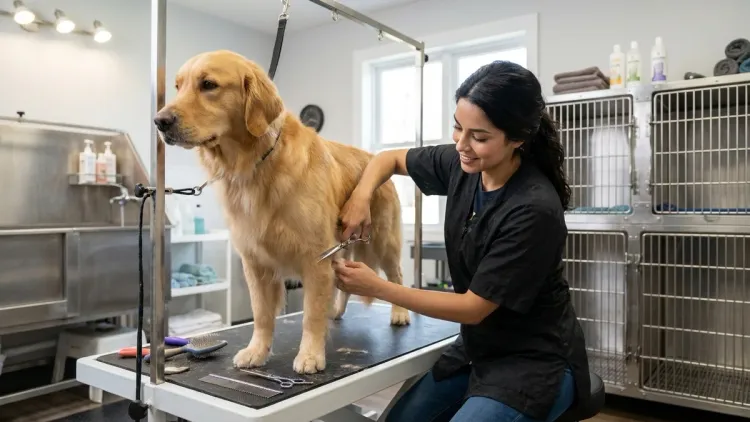
Once your dog is completely dry, you're ready for the precision work that truly defines how to groom dog for show. Scissoring isn't about changing your dog's structure—it's about revealing and enhancing what's already there by removing excess coat and creating clean lines.
Start with your grooming table at the proper height (you shouldn't hunch or reach). Attach your dog to the grooming arm using a proper grooming loop—never leave them unattended while restrained.
Study your dog from every angle before making your first cut. Walk around the table. Crouch to eye level. Look for areas where excess coat creates optical illusions—thick neck furnishings that make the neck look short, long hocks that make legs appear straight, fluffy coats that hide angulation.
For most breeds, key scissoring areas include:
Feet and pasterns: Remove hair between pads and trim feet into tight, compact shapes. Neat feet make legs look longer and cleaner. Use thinning shears to blend the trim line into the leg furnishing.
Hocks and rear angulation: Carefully scissor the back of the hock to reveal the angle and tendon definition. This is subtle work—you're removing just enough coat to show structure without creating obvious scissor lines.
Topline: For breeds that require a smooth topline, use thinning shears to blend any bumps or dips in the coat that distort the backline. Never create a fake topline through excessive trimming—judges see right through it.
Neck and front: Trim the throat latch area to create a clean transition from jaw to neck. Blend shoulder coat to emphasize front assembly. For breeds with neck ruffs, shape them to frame the head without overwhelming it.
Ears: Trim ear edges for breeds that require it (Poodles, Portuguese Water Dogs), or simply neaten feathering for spaniel breeds. Ear trimming should look effortless, never choppy.
Tail: Shape according to breed standard—some tails need full plumes, others require neat tapering, still others should be barely touched.
Work slowly with sharp scissors. Dull scissors crush coat ends and create ragged lines. Use thinning shears for blending—they're more forgiving than straight shears and create softer transitions. Take multiple small cuts rather than one big one. Step back frequently to assess your work from a distance.
Different age groups need different approaches. Senior dogs often have thinner coats that require gentler scissoring to avoid over-trimming, while puppies' fluffy coats may need more aggressive thinning to reveal structure underneath.
Step 6: Final Coat Finishing and Presentation Details
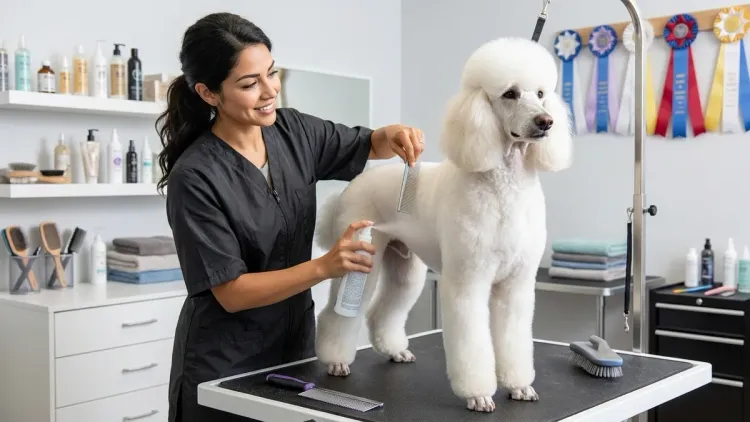
With the major grooming complete, focus now shifts to the finishing touches that create that professional, ring-ready polish. These details separate decent grooming from championship presentation.
Apply breed-appropriate finishing products sparingly. For silky coats (Yorkies, Maltese, Afghan Hounds), use a light finishing spray that adds shine without oil. For harsh wire coats, avoid any products that soften texture—a light coat dressing at most. For white dogs, grooming chalk or powder applied to white markings and brushed through creates brilliant whiteness. The Chris Christensen White on White Shampoo helps maintain brightness between shows.
Brush through the coat one final time, ensuring every hair lies in the correct direction. Use your metal comb to check for any tiny tangles you missed, particularly in feathering and ear fringes. These details matter more than you'd think—judges run their hands through coat and immediately feel imperfections.
Do a final check of all the non-coat details:
- Teeth: Wipe with a damp cloth to remove any food residue
- Eyes: Clean any tear stains or crustiness from inner eye corners
- Nose: Should be clean and moist, not caked with debris
- Paw pads: Confirm no trapped debris between pads
- Sanitary areas: Make sure rear end is immaculately clean
For dogs with white facial markings or white feet, some exhibitors apply a very light dusting of cornstarch-based grooming powder, then brush it out completely so only brightness remains. This is legal in most venues but check your specific show's rules—some ban all powders.
Practice your ring presentation. Your beautifully groomed dog needs to stack properly and gait smoothly. A perfectly groomed dog that won't stand still or fights the lead won't impress judges. Use the same show lead you'll use in the ring so your dog associates it with show time.
Step 7: Pre-Show Maintenance and Ring-Side Touch-Ups
The night before the show, focus on keeping your hard work intact. Crate your dog on clean bedding that won't mat or tangle coat. Some exhibitors use raised cot-style beds that prevent coat from getting crushed. Others place dogs in exercise pens rather than tight crates to minimize coat compression.
Limit food and water timing to prevent potty accidents that could soil a clean coat, but never withhold water to the point of dehydration. Most exhibitors offer a moderate dinner the night before and a light breakfast day-of, with water available except for the hour immediately before ring time.
Morning of the show, do a quick assessment. Brush through the coat gently to restore any flattened areas. If your dog developed any eye crusties overnight, carefully remove them with a damp cloth. Check feet for any debris collected since grooming.
Bring a complete ring-side kit—refer to a comprehensive dog show equipment checklist for everything you need. At minimum, carry: grooming spray, brushes, comb, scissors for last-minute trimming, towels, water bowl, and any breed-specific tools.
Right before entering the ring, do your final fluff and polish. Spray a light mist of coat conditioner and brush through. Use a softer brush for this final pass to avoid creating static. Check that ear feathering lays properly, tail is perfectly shaped, and feet look tight.
Some breeds benefit from a quick spritz of water on the topline to eliminate static and flyaways. Others need a final pass with a boar bristle brush for shine. Know what works for your breed's coat type.
Stay calm. Dogs pick up on handler stress instantly, just like my guinea pigs sense when I'm anxious and respond with skittish behavior. Your confident, relaxed energy helps your dog present their best in the ring.
Step 8: Post-Show Care and Coat Maintenance
After your time in the ring ends, proper post-show care sets you up for success at the next event. Many exhibitors make the mistake of neglecting their dog's coat after a show, then scramble to repair damage before the next one.
If your dog got dirty during the show (grass stains, drool, ring dust), spot-clean those areas rather than doing a full bath immediately. Over-bathing strips natural oils and can damage coat quality over time. Use a damp cloth with a tiny amount of shampoo on soiled areas only, then rinse the spot thoroughly and dry.
Brush through the coat to remove any tangles or debris accumulated during the show day. Even a few hours at a show creates surprising amounts of small mats, especially in friction zones. Removing these immediately prevents them from setting.
Evaluate what worked and what needs adjustment for next time. Did the scissoring hold up under the judge's hands-on examination? Did the coat maintain its texture throughout the day? Did your finishing products create the effect you wanted? Take notes while details are fresh—I keep a grooming journal for my guinea pigs tracking what works, and the same practice serves show dog handlers well.
Plan your maintenance schedule between shows. Most show dogs benefit from weekly brushing and combing, monthly nail trims, and bathing 7-10 days before each event. Consistent coat care between shows makes each prep cycle easier, just as my daily guinea pig brushing prevents the felting disasters I experienced when I first started.
For dogs showing regularly (multiple weekends per month), coat condition becomes critical. Ensure they're receiving proper nutrition—high-quality protein supports coat health. Some exhibitors add coat supplements containing omega fatty acids, biotin, or other nutrients. Always consult your veterinarian before adding supplements, particularly for puppies or senior dogs whose nutritional needs differ from adult dogs. Our guide on choosing the right dog food covers nutritional basics.
Pro Tips & Common Mistakes to Avoid
After researching countless hours of show grooming techniques and talking with experienced handlers, here are the insights that separate novices from pros:
Start with a realistic assessment of your skill level. Many breeds—Poodles, Bichons, most terriers, and Cocker Spaniels—require professional-level scissoring skills that take years to develop. There's no shame in hiring a professional groomer for the precision work while you handle maintenance between shows. I learned this with my guinea pigs: knowing when to seek expert help (like nail trims for my squirmy boys) prevents disasters.
The biggest mistake beginners make is over-grooming. More scissoring doesn't equal better results. When you start removing coat just because you have scissors in hand, you've crossed into dangerous territory. Step away, take a break, and return with fresh eyes.
Temperature management matters more than most people realize. Dogs bathed in cold water have coats that don't clean properly. Dogs dried with too-hot air develop brittle, damaged coat. Keep bathwater lukewarm and dryer settings moderate.
Practice your entire grooming routine multiple times before the actual show. You need muscle memory for these tasks, and your dog needs desensitization to the process. Puppies especially require gentle, positive introductions to bathing, drying, and table work. For more training foundation, see our guide on puppy training tools.
Don't experiment with new products the week before a show. That conditioning treatment that worked miracles for your friend's dog might make your dog's coat too soft. The whitening shampoo might be too harsh for your dog's skin. Test all products during off-season practice sessions.
Invest in quality tools. Cheap scissors pull hair instead of cutting cleanly, creating a ragged finish. Low-power dryers take forever and don't achieve proper texture. I spent months using inadequate grooming tools for my guinea pigs before finally upgrading—the difference was remarkable.
Finally, understand that breed-specific grooming styles vary significantly between regions and judges' personal preferences. What wins on the East Coast might look over-groomed on the West Coast. Attend shows as a spectator first. Watch what wins in your breed. Talk to successful exhibitors (most are generous with advice). For context on how judging actually works, read our explanation of dog conformation shows.
Frequently Asked Questions
How long before a show should I bathe my dog?
Most breeds should be bathed 5-7 days before the show, allowing the coat time to settle into its natural texture while remaining clean. Wire-coated terriers often look best bathed 3-4 days prior, while Poodles and breeds requiring crisp scissoring may be bathed as close as 2-3 days before. Smooth-coated breeds like Dobermans can be bathed the day before. Your breed's parent club grooming guide provides specific timing recommendations, as coat type dramatically affects how long that fresh-from-the-bath look persists.
Can I groom my dog for shows myself, or do I need a professional groomer?
You can absolutely learn to groom your own dog for shows, though the learning curve varies significantly by breed. Breeds with minimal trimming requirements—smooth coats like Boxers or natural coats like Border Collies—are beginner-friendly for owner-handlers. Complex scissoring breeds like Poodles, Cocker Spaniels, or most terriers typically require 1-2 years of dedicated practice to achieve competitive results, and many successful exhibitors still use professional groomers for these breeds. Start by learning basic bathing and brushing, attend grooming seminars offered by your breed club, and consider apprenticing with an experienced groomer or handler who can teach breed-specific techniques hands-on.
What's the difference between pet grooming and show grooming?
Show grooming follows strict breed standard requirements and aims to present the dog's natural structure and coat as beautifully as possible within those rules, while pet grooming prioritizes the owner's aesthetic preferences and the dog's comfort. A pet Poodle might sport a fun mohawk or short puppy clip, whereas a show Poodle must wear one of the AKC-approved clips (Continental, English Saddle, or puppy clip for dogs under 12 months). Show grooming typically requires significantly more time, precision, and breed-specific knowledge, while pet grooming offers more creative freedom and often includes practical cuts that reduce maintenance—styles that would disqualify a dog from conformation competition.
How do I keep my dog's coat clean between the final grooming and entering the ring?
Keep your dog crated on clean bedding—many exhibitors use show coats or body suits to protect coat from dirt and breakage. Limit outdoor potty breaks to clean grass areas and use a lead to prevent rolling or playing that could soil the coat. Some handlers use grooming sprays with light stain-resistant properties. Feed and water strategically to minimize potty needs during critical pre-ring hours without causing dehydration. At the show venue, keep your dog in their crate except for necessary breaks and warm-up exercises. Right before ring time, do a quick brush-through and check for any debris or stains that need spot-cleaning. Reference our detailed dog show preparation checklist for comprehensive ring-day timing and care strategies.
Summary
Learning how to groom dog for show transforms from overwhelming to achievable once you break it into systematic steps. Start by studying your breed standard thoroughly, then work backward from show day to create a grooming timeline that suits your dog's coat type and your skill level. The process—pre-bath preparation, strategic bathing, proper drying technique, precision scissoring, finishing touches, and ring-side maintenance—remains consistent across breeds even while specific techniques vary dramatically.
Remember that championship grooming develops through practice and patience. Your first attempt won't be perfect (mine certainly wasn't—ask me about the time I accidentally gave one guinea pig a bald spot while learning to trim mats). But each grooming session builds your skills and deepens your understanding of your dog's coat. Start with the basics, invest in quality tools, and don't hesitate to seek guidance from experienced exhibitors in your breed.
The bond you build with your dog through this grooming process—the quiet table time, the trust they develop as you work on them, the partnership you create—that matters just as much as any ribbon. Now get out there, set up that grooming table, and show the world what your beautifully presented dog can do.