I'll be honest—when I first decided to expand my small-pet expertise beyond guinea pigs, setting up a proper turtle tank setup felt wildly intimidating. Turtles need so much more than a cute bowl with a plastic palm tree (a misconception that still breaks my heart). Whether you're bringing home a red-eared slider hatchling or adopting an adult painted turtle, this comprehensive checklist covers everything you need: basking platforms, UVB lighting systems, filtration equipment, and species-specific water depth requirements. Let's make sure your shelled friend has the healthy, enriching habitat they deserve from day one.
Tank Size and Water Volume Requirements
Getting the tank size right isn't negotiable—it's the foundation of everything else in your turtle tank setup. Too small, and you're fighting water quality issues constantly (trust me, the struggle is real).

Minimum 40-gallon tank for hatchlings: Baby turtles under 4 inches need at least a 40-gallon aquarium, though going larger saves you from upgrading six months later when they hit their growth spurt—I learned that lesson the expensive way.
Ten-gallon rule for adult sizing: The standard formula is 10 gallons of water per inch of shell length, so a 6-inch adult red-eared slider needs a 60-gallon tank minimum, while larger species like common snapping turtles require 120+ gallons.
Length matters more than depth: Choose tanks that are longer and wider rather than tall—turtles are horizontal swimmers who need floor space to move, not vertical water columns to stare at.
Plan for adult size, not current size: That adorable quarter-sized hatchling will likely reach 8-12 inches within a few years depending on species, so either invest in the adult-sized tank now or budget for the inevitable upgrade.
Indoor pond alternatives for large species: For turtles that exceed 10 inches (like common cooters or softshell turtles), a 100-300 gallon stock tank or custom indoor pond often makes more practical and financial sense than massive glass aquariums.
Separate dry area doesn't count toward water volume: When calculating gallons, only measure the water portion—the basking platform takes up tank real estate but doesn't contribute to the livable aquatic space your turtle needs.
Water Depth Specifications by Species
This is where species-specific research becomes critical. Not all turtles are confident deep-water swimmers, and getting the depth wrong creates genuine safety risks.
Red-eared sliders, painted turtles, and cooters: These strong swimmers thrive in water that's 1.5-2 times their shell length deep—so a 6-inch slider does well in 9-12 inches of water, giving them room to dive and explore.
Musk and mud turtles: These bottom-walkers prefer shallower setups with water depth equal to or just slightly deeper than their shell length (4-6 inches for adults), as they're not built for constant swimming and can tire easily.
Softshell turtles: Despite their aquatic nature, softshells appreciate moderate depths of 8-12 inches with plenty of floor space, since they spend significant time buried in substrate hunting for food.
Hatchlings need accessible surfaces: Baby turtles tire quickly, so keep water depth around 5-6 inches maximum regardless of species until they develop stronger swimming muscles—watching a hatchling struggle to reach the surface for air is genuinely stressful.
Include shallow wading areas: Even strong swimmers benefit from a gradual depth slope or stacked rocks creating a shallow zone where they can rest while remaining submerged, similar to how wild turtles use pond shallows.
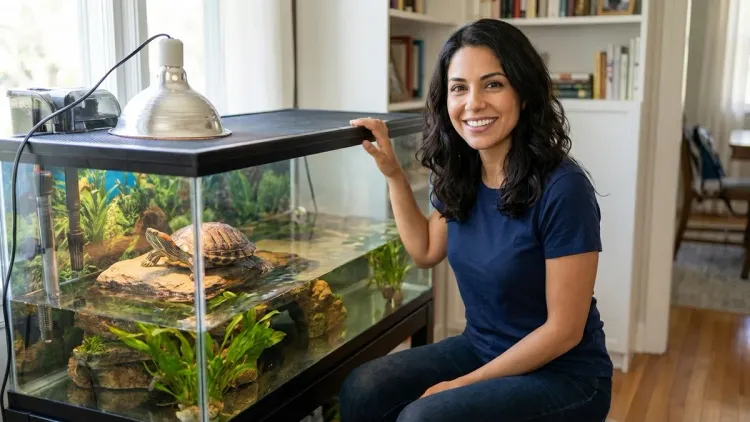
Basking Platform Essentials
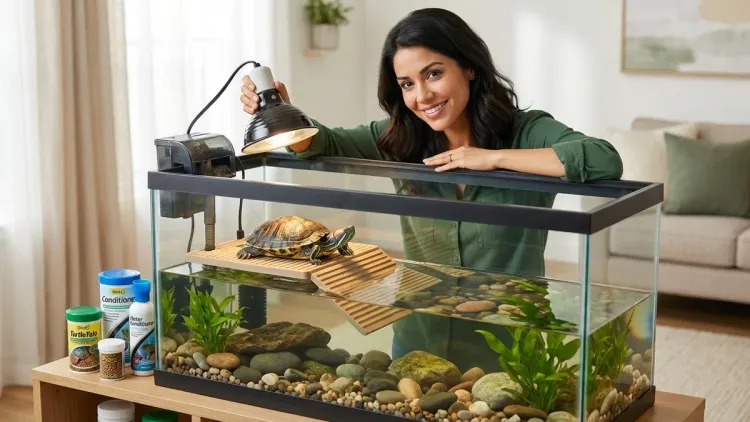
The basking area is where turtles dry off, thermoregulate, and absorb essential UVB radiation. Skimping here leads to shell rot, metabolic bone disease, and miserable turtles.
Completely dry surface: The platform must allow your turtle to get entirely out of the water with zero submersion—partially wet basking defeats the purpose of drying the shell to prevent bacterial and fungal growth.
Textured, non-slip material: Smooth surfaces create climbing struggles; opt for natural cork bark, slate tiles, or commercial basking docks with textured surfaces that give wet turtle feet something to grip.
Sized for full body plus 30%: Your turtle should fit completely on the platform with room to turn around—overcrowded basking areas cause turtles to skip basking sessions, which cascades into health problems.
Easy access ramp or gradual incline: Turtles aren't great climbers; they need a gentle ramp (maximum 30-degree angle) or stacked stones creating a gradual approach to the basking surface, not a vertical wall to scale.
Stable and secure mounting: Basking platforms must be anchored firmly enough that they won't tip when your turtle climbs aboard—suction cups work for small turtles, but larger species need weighted or tank-rim-mounted platforms like the Penn-Plax Turtle Topper Above-Tank Basking Platform.
Positioned directly under heat lamp: The platform needs to sit directly beneath both your heat lamp and UVB bulb so your turtle receives proper temperature gradient and UV exposure while basking—placement matters as much as the platform itself.
Temperature of 85-95°F on basking surface: Use a digital thermometer with a probe placed directly on the platform surface (not measuring air temperature) to verify your basking spot hits species-appropriate temps—most aquatic turtles need 88-92°F.
UVB Lighting System Requirements
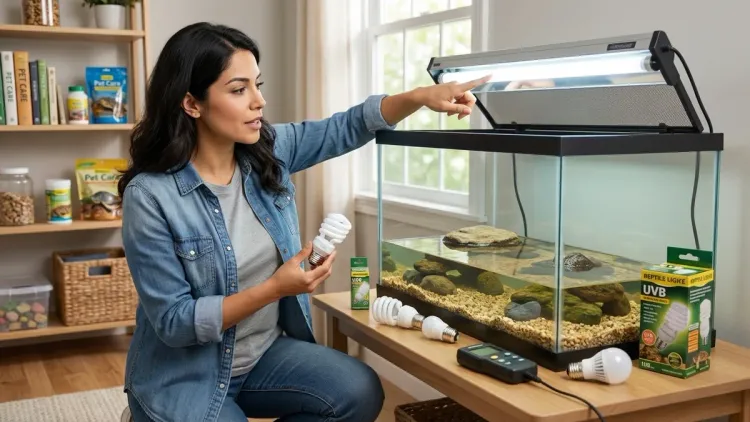
This is where I see the most dangerous shortcuts. Turtles absolutely require UVB radiation to synthesize vitamin D3 and metabolize calcium—without it, you're looking at metabolic bone disease within months.
10-12% UVB output bulbs for aquatic turtles: Look for bulbs specifically rated at 10.0 or 12% UVB (the percentage refers to UVB radiation output), which provides the intensity aquatic turtle species need—lower outputs meant for tropical lizards won't cut it.
Linear fluorescent or mercury vapor bulbs: Linear tube fixtures like the Zoo Med ReptiSun 10.0 T5 HO UVB Lamp provide even coverage across the basking area, while mercury vapor bulbs combine UVB and heat in one unit (though they run hotter and require careful distance management).
Proper distance from basking spot: UVB intensity decreases rapidly with distance; most 10% linear bulbs need to be 10-12 inches from the basking surface, while mercury vapor bulbs require 12-18 inches depending on wattage—check manufacturer specifications religiously.
Replace every 6-12 months: UVB output degrades long before the bulb burns out—even though the light still glows, UVB radiation drops to ineffective levels after 6-12 months of use, so mark your calendar for replacement dates.
No glass or plastic barriers: UVB radiation doesn't penetrate glass or most plastics, so if you're using a mesh tank lid, verify it's UVB-transparent (metal mesh works, fine plastic mesh often blocks UVB entirely).
12-14 hour daily photoperiod: Turtles need consistent day/night cycles; use a timer to provide 12-14 hours of UVB exposure daily, mimicking natural sunlight patterns and supporting healthy circadian rhythms.
Separate heat lamp: Unless you're using a mercury vapor combo bulb, you'll need a dedicated basking heat lamp (ceramic heat emitter or incandescent bulb) in addition to your UVB source—UVB bulbs alone don't generate sufficient warmth for proper basking temperatures.
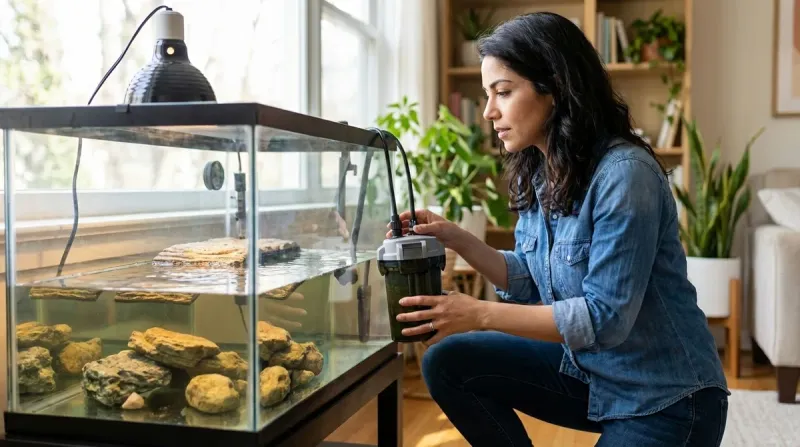
Filtration System Specifications
Turtle filtration is no joke. These animals are messy eaters and prolific poopers, creating waste loads 3-4 times higher than fish of equivalent size. Inadequate filtration turns your tank into a bacterial soup within days.
Filter rated for 2-3x your actual water volume: If your tank holds 75 gallons of water, choose a filter rated for 150-225 gallons—turtles produce exponentially more waste than fish, and undersized filters get overwhelmed quickly, leading to ammonia spikes and sick turtles.
Canister filters for larger setups: For tanks over 55 gallons, canister filters like the Fluval FX4 High Performance Canister Filter provide superior mechanical and biological filtration compared to hang-on-back models, handling higher waste loads with better flow rates—check out our guide on aquarium filter types for detailed comparisons.
Biological, mechanical, and chemical filtration: Your filter needs all three stages—mechanical media (sponges/pads) to trap particulates, biological media (ceramic rings/bio-balls) to house beneficial bacteria that process ammonia, and chemical media (activated carbon) to remove dissolved organics and odors.
Adjustable flow rate: Strong currents exhaust turtles, especially weaker swimmers; look for filters with adjustable flow or add a spray bar attachment to diffuse the output current across the water surface rather than creating a directed jet.
Pre-filter sponge: Adding a coarse sponge over the intake prevents baby turtles from getting sucked against the intake tube and provides extra mechanical filtration for larger debris before it reaches your main filter media.
Clean filter media on a rotating schedule: Never clean all your filter media at once—you'll destroy the beneficial bacteria colony that processes waste. Clean mechanical media weekly in old tank water, replace chemical media monthly, and rinse biological media quarterly at most.
Consider supplemental circulation: Large tanks benefit from a small powerhead or wavemaker creating additional water circulation in dead zones where debris accumulates, improving overall water quality between filter passes.
Heating Equipment for Water Temperature
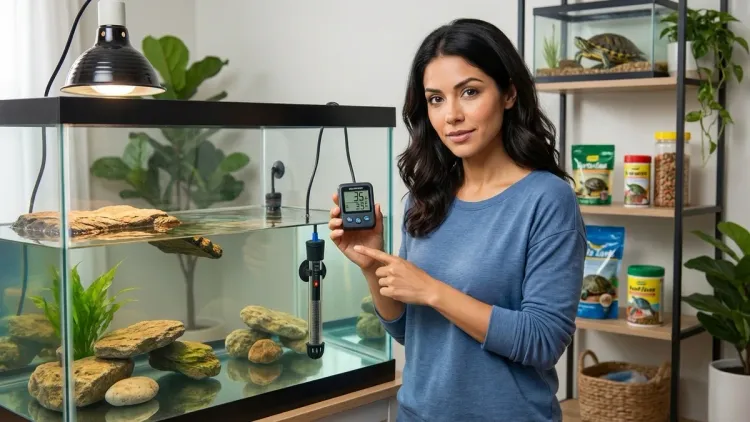
Temperature regulation keeps your turtle's immune system functioning and metabolism running properly. Cold water leads to respiratory infections and appetite loss faster than you'd expect.
Submersible heater rated for tank volume: Choose a fully submersible aquarium heater (not a clip-on type) with wattage appropriate for your water volume—general rule is 5 watts per gallon, so a 75-gallon tank needs a 375-watt heater (or two 200-watt heaters for redundancy).
Target temperature 75-80°F for most species: Red-eared sliders, painted turtles, and map turtles thrive at 76-78°F, while more tropical species like Chinese golden thread turtles prefer 78-80°F—research your specific species' requirements since there's surprising variation.
Heater guard to prevent burns and breakage: Turtles will absolutely bash into, scratch at, and attempt to sit on heaters; a protective cage prevents both thermal burns to your turtle and cracked glass heater tubes that leak electricity into the water (yes, it happens).
Preset vs. adjustable thermostats: Adjustable heaters give you control for seasonal changes, but preset models at 78°F work fine if that matches your species' needs and are less prone to accidental temperature dial bumps.
Backup thermometer verification: Never trust the heater's built-in thermostat alone; use a separate digital aquarium thermometer placed away from the heater to verify actual water temperature throughout the tank.
Position near filter output: Placing the heater near your filter's output flow helps distribute heated water throughout the tank more evenly, preventing cold pockets in corners far from the heater.
Water Quality and Conditioner Requirements
Tap water straight from the faucet contains chlorine, chloramine, and heavy metals that harm turtles and destroy the beneficial bacteria in your filter. Water prep is non-negotiable.
Dechlorinator for all water changes: Use an aquarium water conditioner that neutralizes both chlorine and chloramine before adding tap water to your tank—products like API Tap Water Conditioner work within minutes and are concentrated enough that a small bottle lasts months.
25-50% water changes weekly: Remove and replace 25-50% of tank water every week to dilute accumulated nitrates and dissolved organics; more frequent partial changes maintain better water quality than infrequent large changes that shock your turtle with parameter swings.
Test water parameters monthly: Use liquid test kits (more accurate than strips) to monitor ammonia (should be 0 ppm), nitrite (should be 0 ppm), nitrate (keep below 40 ppm), and pH (7.0-8.0 for most species)—the API Freshwater Master Test Kit provides everything you need.
Gravel vacuum during changes: Don't just siphon surface water; use an aquarium gravel vacuum to pull water from the substrate level, sucking up accumulated waste, uneaten food, and debris that contribute to poor water quality.
Match temperature when adding water: New water should be within 2-3 degrees of existing tank temperature to avoid thermal shock—I heat replacement water in clean buckets using an extra aquarium heater before adding it to the tank.
Consider RO water for sensitive species: If your tap water has extreme hardness, high mineral content, or persistent chemical additives beyond chlorine, investing in a reverse osmosis filter system or buying RO water for tank maintenance may become necessary for delicate species like softshells.
Substrate Considerations and Options
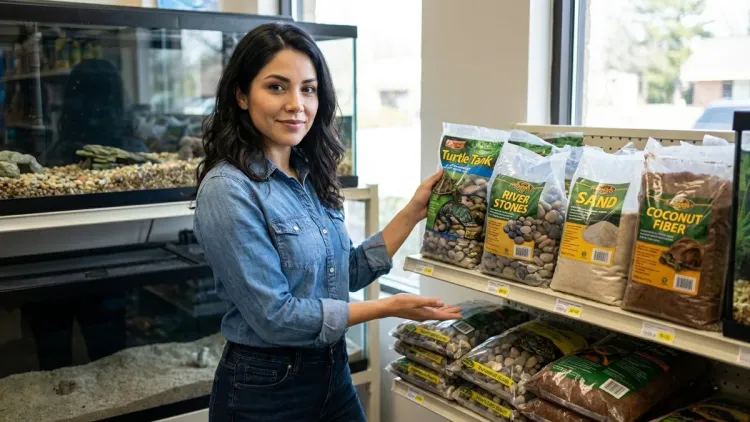
Substrate choice is surprisingly controversial in turtle keeping. There are legitimate pros and cons to each approach, and honestly, I've flip-flopped on this myself.
Bare-bottom tanks for easiest maintenance: Many turtle keepers skip substrate entirely—bare glass bottoms make it easier to spot waste during cleaning and ensure nothing hides to decompose, though the aesthetic is decidedly sterile and turtles lose foraging enrichment.
Large river rocks (too big to swallow): If you want a natural look, use smooth river stones at least twice the size of your turtle's head to prevent accidental ingestion—turtles absolutely will try to eat gravel, and intestinal impaction requires emergency surgery.
Sand for softshell and musk turtles: Species that naturally bury themselves (softshells, musk turtles) benefit from a 2-3 inch layer of fine aquarium sand that allows natural burrowing behavior, though sand requires more careful maintenance to prevent anaerobic dead spots.
Avoid small gravel entirely: Standard aquarium gravel (pea-sized) is a genuine hazard for turtles—they mistake it for food, swallow it, and end up with blockages that can be fatal.
Tile or slate for natural aesthetic: Large slate tiles or flat river rocks create a natural-looking bottom that's easier to clean than loose substrate while still providing visual interest and a less slippery surface than bare glass.
Temperature Gradient and Cooling Zone
Turtles are ectothermic—they can't regulate body temperature internally and rely entirely on environmental temperature zones to thermoregulate. You need to provide options.
Cool end water 75-78°F: The section of tank farthest from heaters and basking lamps should maintain the lower end of your species' temperature range, giving your turtle a place to cool down if they overheat.
Basking spot 85-95°F: The basking platform under your heat lamp should hit 88-92°F for most aquatic turtles (species-specific; check requirements), measured with a surface thermometer directly on the platform, not air temperature above it.
Ambient air temperature 75-80°F: The air temperature in the enclosed space above the water (if you're using a tank lid) should stay in the mid-to-upper 70s—too cold and turtles won't want to bask, too hot and they overheat.
Multiple thermometers in different zones: Place one thermometer at the cool end, one at the warm end, and one measuring basking surface temperature so you can verify the gradient is working properly—eyeballing it doesn't work.
Room temperature affects tank temp: If your home gets cold in winter or hot in summer, you may need to adjust heater settings or add cooling fans seasonally to maintain proper temperature ranges throughout the tank.
Tank Cover and Lighting Hood Setup
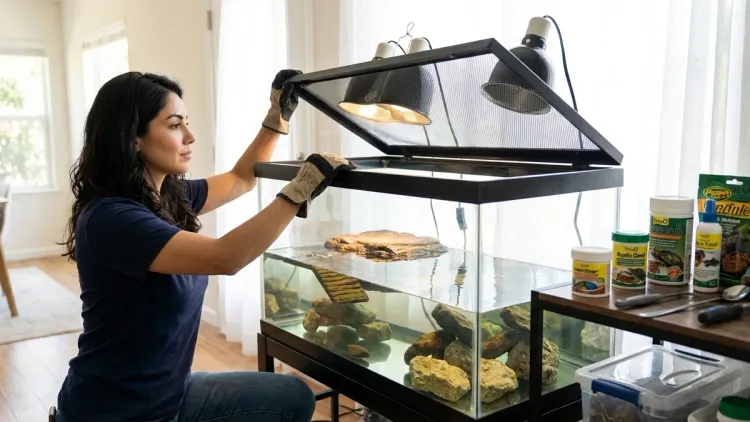
You need some way to support lighting and prevent escapes, but traditional glass lids create major problems for turtle setups. Here's the reality check.
Screen top for UVB penetration: Metal screen lids allow UVB radiation to pass through while providing structural support for lights and preventing jumpers (yes, turtles will climb out if they can)—avoid glass or solid plastic lids that block essential UVB.
Custom DIY screen frames: For non-standard tank sizes or above-tank basking platforms, building a simple wood-frame screen top using aluminum mesh gives you perfect fit and UVB transparency for under $30 in materials.
Secure all openings: Turtles are surprisingly strong and determined escape artists—any gap in your lid needs to be either too small to fit through (less than half their shell width) or secured with clips that prevent lifting.
Ventilation to prevent humidity buildup: Good airflow prevents excessive condensation and maintains air quality; even with a screen top, ensure you're not creating a completely sealed humid box if using above-tank basking areas.
Lighting fixture placement: Mount heat and UVB lamps securely either on the screen lid (using clamp fixtures with appropriate weight distribution) or on stands positioned over the basking area—dangling lights from ceiling hooks works but makes maintenance awkward.
Cycled Tank Preparation Before Adding Turtle
This step requires patience, but it's absolutely essential. Adding a turtle to an uncycled tank means exposing them to toxic ammonia and nitrite levels that cause serious illness.
Understand the nitrogen cycle: Beneficial bacteria colonies need 4-8 weeks to establish in your filter media, converting toxic ammonia (from waste) into nitrite, then into less harmful nitrate—this biological filtration system is what makes water safe long-term. Our detailed guide to aquarium nitrogen cycle breaks down the process week by week.
Fishless cycling with ammonia source: Add pure ammonia or fish food to the empty tank to feed bacteria growth without endangering animals; test water daily until you see ammonia spike, then drop to zero as nitrite rises, then nitrite drops and nitrate appears.
Expect 4-8 weeks before adding turtle: I know waiting sucks when you have an adorable turtle sitting in a temporary container, but cycling cannot be rushed safely—using bacterial starter products may shorten the cycle to 3-4 weeks but won't eliminate it entirely.
Temporary housing during cycling: Keep your turtle in a large plastic storage bin with shallow water, basic heat lamp, and daily 100% water changes while their permanent tank cycles—it's not ideal long-term, but it's safer than ammonia exposure.
Verify with test kits: Your tank is cycled when you can add ammonia and see it convert to nitrate within 24 hours with zero detectable ammonia or nitrite—only then is it safe to move your turtle permanently.
Decorations, Plants, and Enrichment Items
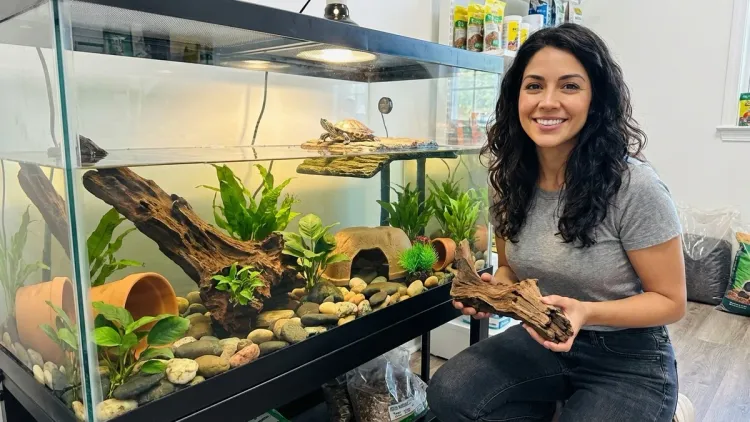
Once all the technical requirements are met, adding visual interest and behavioral enrichment transforms a functional tank into an engaging habitat that supports natural behaviors.
Live plants (if compatible with species): Turtles decimate plants, but fast-growing species like java fern, amazon sword, or hornwort provide hiding spots, improve water quality, and offer occasional nibbling for omnivorous turtles—expect to replace them periodically.
Artificial plants with weighted bases: High-quality silk or plastic plants give visual appeal and hiding spots without dying; ensure they're firmly weighted or secured so turtles can't dislodge them and create floating hazards.
Hiding caves and exploration tunnels: Turtles appreciate having retreat spaces; large PVC pipe sections, stacked slate caves, or commercial reptile hides give them security—watching a turtle wedge themselves into an impossibly small cave never gets old.
Feeding diversity items: Floating logs, feeding platforms, or scattered hide-and-seek food encourage natural foraging behaviors beyond just dumping pellets on the surface.
Avoid sharp edges and small parts: Inspect all decorations for rough edges that could scratch shells or small detachable pieces turtles might swallow—if it fits in their mouth, assume they'll try to eat it.
Final Check Before You Go
Let's make absolutely sure you've got everything in place for a successful turtle tank setup:
Tank and Structure:
- Appropriately sized tank (10 gallons per inch of shell)
- Proper water depth for species
- Stable basking platform with dry surface
- Secure screen top or custom lid
Temperature and Lighting:
- Submersible heater with guard
- Water temperature 75-80°F verified
- Basking heat lamp creating 88-92°F surface temp
- 10-12% UVB bulb properly positioned
- Thermometers in multiple zones
Filtration and Water Quality:
- Filter rated for 2-3x tank volume
- Water conditioner for chlorine removal
- Test kit for ammonia, nitrite, nitrate, pH
- Gravel vacuum for substrate cleaning
- Established nitrogen cycle (4-8 weeks)
Optional but Recommended:
- Substrate choice or bare-bottom decision made
- Plants and decorations secured
- Backup heater or thermometer
- Timer for lighting photoperiod
Frequently Asked Questions
Can I use a stock tank instead of a glass aquarium for my turtle?
Yes, stock tanks (the large plastic tubs used for livestock) make excellent turtle habitats, especially for large adults—they're durable, hold massive water volumes (100-300 gallons), cost significantly less than glass aquariums of equivalent size, and the opaque walls reduce stress for shy turtles. You'll need to get creative with basking platform mounting since stock tanks lack rim edges for commercial basking docks, but DIY solutions using PVC platforms or above-tank basking ramps work beautifully. Just ensure the stock tank is food-grade plastic to avoid chemical leaching.
How do I clean a turtle tank without destroying the beneficial bacteria?
Clean your turtle tank in stages rather than all at once—during weekly water changes, vacuum the substrate or wipe the bare bottom, clean algae from glass, and rinse the filter's mechanical media (sponges/pads) in old tank water you've siphoned out, not tap water that would kill beneficial bacteria. Never clean biological filter media (ceramic rings, bio-balls) at the same time you clean mechanical media; alternate them every other week. The beneficial bacteria colony primarily lives in your filter's biological media and substrate, so as long as you're not bleaching those surfaces or replacing all media simultaneously, the colony survives regular maintenance.
Do baby turtles need different equipment than adult turtles?
Baby turtles need the same equipment categories (filtration, heating, UVB, basking) but with adjusted specifications—they require shallower water (5-6 inches regardless of species), proportionally smaller basking platforms they can actually climb onto, and identical temperature and UVB requirements as adults. The biggest difference is you can start hatchlings in smaller tanks (40 gallons minimum) knowing you'll upgrade as they grow, whereas adults need their full-size setup from day one. Don't fall for those tiny turtle bowl kits marketed for hatchlings; they're fundamentally inadequate and create the exact health problems you're trying to avoid.
Final Thoughts
Setting up a proper turtle tank setup is genuinely more complex than I expected when I first ventured beyond my guinea pig comfort zone—the equipment list is longer, the nitrogen cycle adds weeks of waiting, and the ongoing maintenance is substantial. But watching a healthy turtle confidently swimming through clean water, hauling themselves onto their basking platform under proper UVB, and displaying natural behaviors in a well-designed habitat? That's the reward that makes the setup effort worthwhile. Your turtle can't tell you when something's wrong with their environment; they just gradually stop eating, develop shell problems, or suffer respiratory infections from inadequate care. Get the fundamentals right from the start, and you're setting up both yourself and your shelled companion for years of successful keeping rather than months of frustration and vet bills. For more guidance on aquatic habitat setup, our aquarium equipment checklist covers overlapping supplies that work for both fish and turtle keepers.